Pages

Friday, August 15, 2014

Stair Components and Terminology

To watch the video on this subject go to ‘Stair Components and Terminology’


Rise Of Flight
The rise of flight is the vertical distance between the finished floor levels (F.F.L) or landings.


Going of Flight
This is the horizontal distance from the face of the first Riser to the face of the last Riser.


String or Stringer
Designed to carry the load of the stairs, there can be 1, 2 or even 3 for wide stairs. They normally form the side of the stairs however they can also be placed underneath.


Tread
The part that you step on.


Riser
The Riser or Riserboard closes the gap between the Treads. Normally omitted in External or Industrial stairs.
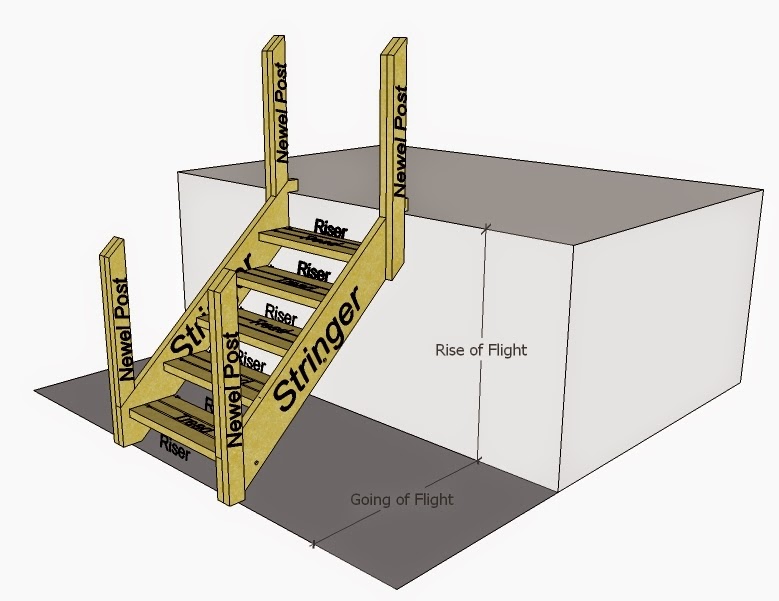


Newel Post
This is the upright post attached to the Stringer which supports the Handrail.


Handrail
Runs Parallel to the Stringer a minimum of 865mm vertically from the margin line. It provides support for the users.


Balusters
The vertical members that fill in the space between the Handrail and the Stringer.

Balustrade
This is the Handrail, Balusters, Newel Posts and other components that form the Handrail combined.


Rise of Step

This is the distance from the top pf one Tread to the top of the next.


Going of Step
This is the distance from the front on one tread to the front of the next.


Margin
This is the distance from the edge of the stringer to the point of the treads.


Tie Rods
Used to tie the stringers together so they don't separate over time. Spaced every 1350mm along the length of the Stringer.

Saturday, August 9, 2014

Backfill a Retaining Wall

To watch the video on this subject got to “Backfill a Retaining wall”


The design of a retaining wall is usually the responsibility of a structural engineer or you need to use a patented wall system so I am not going to talk about the wall itself rather what we need to do when we backfill.


If we were just to backfill hard up against the wall with the existing soil on the site or imported soil there is the chance that, in wet conditions, water will build up behind the wall and increase the weight of the soil acting on the wall. This is especially true if the wall system doesn’t let water pass through it.


So at the bottom of the wall we need to have a way for water to get around the wall. This is achieved by bedding a Agricultural Pipe ( Ag Pipe) in approx 50mm of sand. The pipe should be connected to the stormwater system or into an appropriate drain.


On top of the pipe we need a well draining material such as blue metal or recycled crushed concrete. This will need to be added in as the site is filled.


We also need to make sure that our well draining material doesn’t become clogged with the soil from the rest of the site over time. This can be achieved by placing a Geotech fabric between the two materials.


A couple of 100mm from the top you should finish the well draining material, put in a layer of Geo-tech and then cover with topsoil so everything is hidden.


Now we have a system that we ensure that our Retaining wall is only exposed to the loads that it was designed for and excess water is diverted to where it can’t do any  damage.

Wednesday, July 2, 2014

Timber Frame Cut in Floor Section Part 3

To see how we got here got to Timber Frame Cut in Floor Section Part 2


Next I would get the strip flooring cut to length and laid out, UPSIDE DOWN, so that it has a chance to season to local conditions and provides a floor to work and walk on.

A ribbon bearer is installed to fasten the lower weatherboards to.


With an cladding system it is advisable to install sarking. 


Make sure that your window and door jams are installed and correctly flashed an the you can start installing the cladding.


All cladding should be installed as per the manufacturers instructions. All natural timber product should be pre primed on the back and joints where you won’t be able to paint them once they are installed. All Fasteners should be able to resist exposure to the weather. Ensure that any joints are tight and waterproof. To see more on this process watch these videos: https://www.youtube.com/watch?v=zdGSH8hY5VA
The cladding should also, where possible, be spaced so that all the board are even right to the top of the seen wall. To see more on this process watch this video:


With the Cladding complete the eave frame can be built. There are a few different styles of eaves that you could have, the one shown here is a Boxed or Level Eave.


The finished eave should finish around 10mm above the brickwork to allow for the timber frame to settle overtime. 


A quad or similar moulding is used to cover the gap and still allow for the movement. 

Architrave are installed around the windows and doors. Ensure that the materials you use will stand up to the weather conditions.


Skirting blocks should be installed to give you something other than the studs to nail to. These can just be blocks of anything, they don't need to be cut in tight.


With the outside finished the work inside can really start. Internal linings such as Plasterboard can be installed. 


Plasterboard can also be used on the ceiling and the intersection covered with a cornice moulding again made from Plasterboard.


Try to leave turning the floor over and nailing it down for as long as possible so that any paint or plaster end up on the back not the finished face.


Architrave is used to cover the gap between the window jamb and the wall. 


Skirting mould use to cover the connection between the wall and the floor.